What is the Process for Leveling a Warehouse Floor?
Leveling a warehouse floor involves seven main steps: comprehensive floor assessment, strategic hole drilling, injection port installation, polyurethane foam injection beneath slabs, real-time elevation monitoring, foam curing in 15 minutes, and hole patching. The entire process typically completes in 2-6 hours with same-day return to operations.
Concrete leveling addresses uneven warehouse floors quickly and affordably. Modern polyurethane foam injection provides the fastest solution with minimal operational disruption. The process lifts settled concrete precisely while filling voids beneath slabs. Facilities maintain operations during repairs with most work completing during off-shifts. Understanding each step helps warehouse managers plan projects and minimize downtime costs.
Key Takeaways
- Seven-Step Process Completes Same Day: Floor assessment identifies problem areas, technicians drill small holes, install injection ports, pump expanding foam beneath slabs, monitor elevation changes, allow 15-minute cure, and patch holes for same-day completion.
- Assessment Determines Leveling Approach: Laser scanning maps entire floor surface, void detection identifies problem areas, floor flatness measurements guide corrections, severity ranking prioritizes repairs, and comprehensive evaluation determines appropriate methods and costs.
- Small Holes Minimize Disruption: 3/8-inch diameter holes compared to mudjacking's 1-2.5 inch openings, grid spacing of 4-6 feet for uniform settlement, 200-250 holes typical for 5,000 square foot section, minimal mess allowing adjacent operations continuing safely.
- Foam Cures in 15 Minutes: Polyurethane reaches 90% strength after 15 minutes, complete cure within 15-60 minutes depending on formulation, supports up to 14,000 pounds per square foot, enables return to operations within 2-4 hours total project time.
- Real-Time Monitoring Ensures Precision: Laser levels create reference planes tracking elevation, digital readouts show adjustments to 1/16 inch accuracy, technicians control pressure and flow preventing over-lifting, multiple monitoring points ensure comprehensive tracking across large areas.
- Costs 30-40% of Replacement: Polyurethane injection ranges $5-$25 per square foot, concrete replacement requires $8-$20 plus demolition, foam creates $20,000 downtime versus $120,000 for replacement, lightweight material adds minimal stress to compromised soil.
Initial Assessment and Floor Evaluation
The leveling process starts with comprehensive floor evaluation. Technicians identify problem areas and determine the best correction method.
Floor flatness surveys use laser scanning equipment:
- Maps entire warehouse surface accurately
- Identifies all irregularities and problem zones
- Measures Floor Flatness (FF) numbers
- Measures Floor Levelness (FL) numbers
- Follows 0
Higher FF numbers mean smoother surfaces. This matters for forklifts and automated equipment. Bumpy floors slow operations and damage machinery.
Site assessment involves multiple techniques:
- Sounding detects voids beneath concrete
- Mapping shows problem area locations
- Ranking severity from one to three
- Digital levels measure exact deviations
- Laser profiling systems track slopes
Technicians check if floors have slopes or low spots. They identify areas needing immediate attention. Budget priorities guide which sections get repaired first.
Subgrade evaluation determines why settlement occurred. Common causes include soil compression, erosion from water, and poor initial compaction. Understanding the cause guides the leveling method choice.
| Assessment Type | Equipment Used | What It Measures | Time Required | Cost Range |
| Floor Flatness Survey | Laser scanners | FF/FL numbers, surface variations | 2-4 hours | $500-$2,000 |
| Void Detection | Sounding equipment | Hollow areas beneath slabs | 1-3 hours | $300-$1,000 |
| Elevation Mapping | Digital levels, lasers | Height differences, slopes | 2-5 hours | $400-$1,500 |
| Soil Testing | Probes, samples | Subgrade condition | 1-2 hours | $200-$800 |
Step 1: Strategic Hole Placement and Drilling
Once assessment completes, technicians drill small holes through concrete. These holes allow foam injection beneath slabs.
Hole specifications are precise:
- Typically 3/8 inch diameter
- Much smaller than mudjacking's 1-2.5 inch holes
- Leaves minimal visible marks
- Creates less mess during work
- Reduces patching time and cost
Grid patterns depend on settlement type. Uniform settlement uses 4-6 foot spacing across entire area. Void-focused patterns concentrate around detected hollow spots. Perimeter patterns address edge settlement issues specifically.
A typical 5,000 square foot warehouse section needs 200-250 holes. Using 5-foot grid spacing provides adequate coverage. The drilling process takes 2-3 hours to complete.
Drilling equipment includes:
- Rotary hammer drills for efficiency
- Diamond-tipped bits for clean holes
- Vacuum systems removing dust immediately
- Depth markers ensuring consistent drilling
- Safety equipment protecting workers
Clean holes are essential for proper injection. Technicians vacuum each hole removing all concrete dust and debris. This ensures foam flows freely and bonds correctly.
Step 2: Injection Port Installation
After drilling completes, technicians install injection ports. These ports provide secure entry points for foam delivery.
Port installation process:
- Insert packer into each drilled hole
- Secure ports preventing movement
- Check each connection for tightness
- Verify no blockages exist
- Prepare for foam injection
Ports allow controlled foam delivery. They prevent backflow during injection. Quality ports ensure foam goes beneath slabs, not back through holes.
Different port types serve different purposes. Some ports work for single injections. Others allow multiple foam applications. Technicians choose appropriate ports based on project needs.
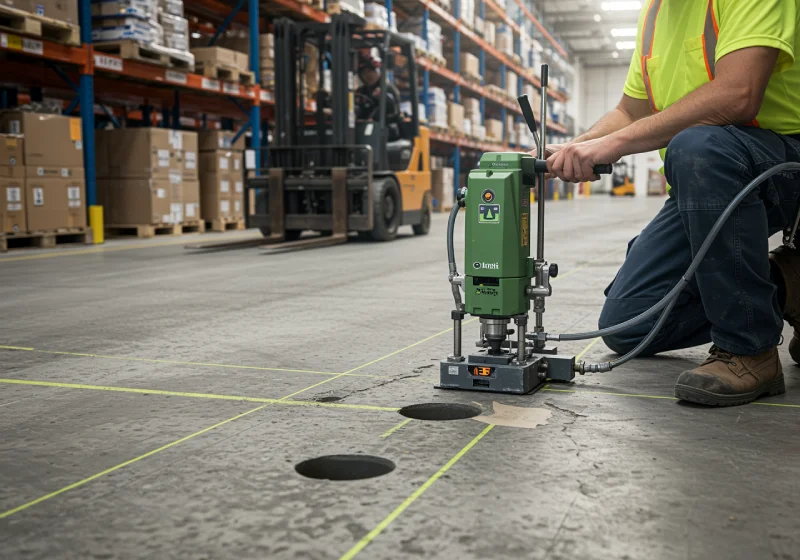
Step 3: Polyurethane Foam Injection
This step injects expanding foam beneath concrete slabs. The foam fills voids and lifts settled areas.
The injection equipment includes:
- Meter-mix positive displacement pumps
- Heated hoses maintaining temperature
- Pressure gauges monitoring injection
- Flow meters tracking material usage
- Control systems managing the process
Two-part polyurethane mixture combines at the injection nozzle. The components react immediately when mixed. Foam expands 15-20 times its original volume.
Injection parameters vary by application type. Void filling uses 50-100 PSI pressure with 1-3 gallon per minute flow. Material density ranges 5-15 pounds per cubic foot. This approach fills hollows with minimal lifting.
Slab lifting requires 75-150 PSI pressure. Flow rate increases to 2-4 gallons per minute. Density rises to 10-25 pounds per cubic foot. This provides precise elevation control.
Foundation support uses highest settings. Pressure reaches 100-175 PSI. Density climbs to 15-40 pounds per cubic foot. This creates maximum load-bearing capacity.
The foam expansion process works predictably:
- Foam flows to lowest points first
- Fills voids from bottom upward
- Generates pressure lifting slabs
- Continues expanding until cured
- Creates solid support throughout
Technicians control reaction timing by adjusting liquid temperature and chemical makeup. Shallow injections cure in 5 seconds. Deeper applications delay expansion over 60 seconds. This control prevents foam from escaping through cracks.
| Application Type | Pressure (PSI) | Flow Rate (GPM) | Density (PCF) | Primary Purpose |
| Void Filling | 50-100 | 1-3 | 5-15 | Fill hollow areas, minimal lift |
| Slab Lifting | 75-150 | 2-4 | 10-25 | Raise concrete to proper elevation |
| Foundation Support | 100-175 | 2-4 | 15-40 | Maximum load capacity, stability |
Step 4: Real-Time Monitoring and Control
Technicians monitor elevation changes constantly during injection. This ensures precise results without over-lifting.
Modern laser leveling technology provides:
- Rotary lasers creating reference planes
- Receivers on slab surfaces
- Digital readouts showing changes
- Accuracy to 1/16 inch precision
- Multiple monitoring points
Experienced technicians manage several factors simultaneously. Injection pressure affects lift speed. Material flow rate determines foam quantity. Hole selection sequence controls which areas lift first. Elevation tracking shows real-time progress.
The injection sequence follows a logical pattern:
- Start at lowest elevation points
- Work toward higher areas gradually
- Prevent foam migrating to lifted sections
- Make multiple passes as needed
- Add material returning to previous holes
Continuous monitoring provides instant feedback. If areas lift too quickly, technicians reduce pressure. If lift proves insufficient, they increase flow rate. The goal is smooth, controlled elevation to exact specifications.
Step 5: Foam Curing Period
After injection completes, foam cures rapidly. This quick curing enables fast return to operations.
Polyurethane foam curing timeline:
- 90% compression strength in 15 minutes
- Complete cure in 15-60 minutes
- Depends on specific formulation
- Temperature affects cure speed
- Full strength develops quickly
The cured foam provides impressive load-bearing capacity. Material supports up to 14,000 pounds per square foot. This handles heavy forklifts, equipment, and inventory loads.
Rapid cure time creates major advantages:
- Areas reopen within 30 minutes minimum
- Total project time stays 2-4 hours typically
- Same-day return to full operations
- Minimal disruption to warehouse activities
- Dramatically less downtime than replacement
While foam cures, technicians prepare for hole patching. They clean work areas and ready patching materials.
Step 6: Hole Patching and Finishing
Once foam cures completely, technicians patch all injection holes. This restores warehouse floor appearance and function.
Patching process follows specific steps:
- Clean holes removing dust and debris
- Apply bonding agent ensuring adhesion
- Fill holes slightly overfull allowing settling
- Trowel surface smooth and level
- Color-match patches to concrete
Quality patches must be:
- Flush with surrounding surface
- Fully compacted through entire depth
- Color-matched minimizing visibility
- Weather-resistant for durability
- Strong preventing future problems
Patch materials cure in 1-2 hours typically. Fast-curing compounds allow even quicker reopening. The patches blend with existing concrete making repairs nearly invisible.
Step 7: Quality Verification
Final inspection ensures all work meets specifications. Technicians document results for facility records.
Quality checks include:
- Patches flush and properly finished
- Color matching acceptable
- Full compaction verified
- Weather resistance confirmed
- No surface defects visible
Documentation covers elevation corrections showing before and after measurements. Foam quantities used tracking material consumption. Final flatness measurements proving specifications met. This paperwork provides valuable maintenance records.
Technicians provide warranty information. Most professional contractors guarantee work for specified periods. Warranties cover material performance and workmanship quality.
Alternative Leveling Methods Available
Polyurethane foam injection works best for most situations. However, other methods exist for specific needs.
Self-leveling compound suits minor imperfections. This works for thickness from 1/8 inch to 1 inch. The process involves surface preparation, primer application, mixing compound, pouring material, and allowing cure time.
Surface preparation requires:
- Thorough cleaning removing dirt and grease
- Filling large cracks with appropriate filler
- Ensuring surface accepts primer properly
- Creating conditions for good bonding
Self-leveling compound flows over surfaces. It settles into low spots automatically. Gravity levels the material naturally.
Cure times vary by product:
- Walking traffic after 4-6 hours
- Full operations after 24-72 hours
- Significantly longer than foam
- Requires extended downtime
Material costs range $0.50-$1.00 per square foot. Total installed costs reach $2.00-$3.00 per square foot. This proves economical for minor corrections.
New concrete placement handles severe damage. This requires complete slab replacement. The process involves demolition, subfloor preparation, laser-guided leveling profiles, concrete pouring, and extended curing.
Concrete replacement timeline:
- Demolition takes 1-3 days
- Subgrade prep needs 2-5 days
- Concrete cures minimum 7 days
- Total downtime reaches 10-14 days
- Operations stopped entire period
| Method | Best For | Cure Time | Cost Per SF | Downtime | Longevity |
| Polyurethane Foam | Settlement, voids | 15-60 min | $5-$25 | 2-4 hours | 20-50 years |
| Self-Leveling | Minor imperfections | 24-72 hours | $2-$3 | 1-3 days | 5-15 years |
| Concrete Replacement | Severe damage | 7-14 days | $10-$25 | 10-14 days | 20-30 years |
Timeline and Downtime Comparison
Project duration significantly impacts warehouse operations. Faster completion saves money and maintains productivity.
Polyurethane injection timeline breakdown:
- Site preparation: 1-2 hours
- Drilling and injection: 2-6 hours
- Foam cure time: 15-60 minutes
- Return to operation: Same day, 2-4 hours total
Projects often complete during off-shifts. Warehouses work normally during day. Repairs happen overnight. Facilities reopen by morning shift.
Concrete replacement requires extensive time:
- Demolition: 1-3 days
- Subgrade work: 2-5 days
- Concrete placement: 1 day
- Minimum cure: 7 days
- Total: 10-14 days minimum
The financial impact proves dramatic. Consider a facility losing $10,000 daily in lost production. Polyurethane creates $20,000 downtime cost. Replacement generates $120,000 in losses. The difference reaches $100,000 from timing alone.
Most warehouses minimize downtime to 6-10 hours. Scheduling repairs during low-activity periods helps. Weekend or overnight work prevents day-shift disruption.
Cost Considerations and Budgeting
Understanding costs helps facilities plan budgets. Multiple factors affect total project expense.
Polyurethane foam injection costs:
- Ranges $5-$25 per square foot
- Depends on settlement severity
- Project scope affects pricing
- Larger areas cost less per foot
- Emergency work costs more
The material provides excellent value. Lightweight composition adds minimal weight to compromised soil. High compressive strength supports heavy loads. Closed-cell structure prevents water absorption. Chemical resistance protects against soil acids. Rapid cure enables quick use.
Total project costs include:
- Material expenses for foam
- Labor for technicians and equipment
- Assessment and testing fees
- Patching and finishing work
- Documentation and warranties
Polyurethane typically costs 30-40% of complete replacement. Direct material savings prove substantial. Indirect savings from reduced downtime prove even larger.
Consider a 5,000 square foot project. Polyurethane costs $25,000-$75,000 typically. Replacement costs $75,000-$150,000 plus downtime. Total replacement expense reaches $150,000-$250,000 easily.
Benefits for Warehouse Operations
Level floors improve warehouse efficiency dramatically. Multiple operational areas benefit from proper leveling.
Loading dock improvements include:
- Proper elevation at trailer interface
- Smooth transitions preventing damage
- Safe forklift entry and exit
- Reduced equipment wear
- Faster loading and unloading
Floor joints maintain matching heights. This prevents trip hazards for workers. Equipment operates smoothly across joints. Safety improves throughout facilities.
Aisle settlement from heavy forklift traffic gets permanently corrected. High-traffic zones experience concentrated wear. Foam injection stabilizes these critical areas. Forklifts operate at full speed safely.
Rack support areas bearing concentrated loads become stabilized:
- Pallet rack bases need level support
- Uneven floors tilt racks dangerously
- Products shift or fall from tilted racks
- Level floors prevent rack failures
- Inventory stays secure and safe
Automated systems require properly flat surfaces. Automated guided vehicles follow precise paths. Robotic systems need consistent elevations. Conveyor systems demand level foundations. Meeting FF/FL specifications enables automation.
The minimally invasive process allows adjacent operations continuing. Small holes create little mess. Workers operate safely near work zones. Production maintains during repairs. Revenue continues uninterrupted.
Conclusion
Leveling warehouse floors follows a systematic seven-step process including comprehensive assessment, strategic hole drilling, injection port installation, polyurethane foam injection, real-time monitoring, rapid curing, and professional hole patching. The entire process typically completes in 2-6 hours with same-day return to operations, costing 30-40% less than concrete replacement while providing 20-50 year service life.
Modern polyurethane foam injection provides superior results for warehouse facilities requiring minimal downtime and maximum precision. The method lifts settled concrete accurately, fills voids completely, supports heavy loads immediately, and enables continued operations during repairs. Understanding this process helps facility managers plan projects effectively, minimize operational disruption, and make informed decisions protecting both budgets and productivity.
Ready to level your warehouse floor with minimal downtime? Contact us for professional assessment and expert solutions that restore proper floor elevations, improve safety, enhance efficiency, and enable automated operations while maintaining your facility's productivity schedule.